How to Make a Static Site with Jekyll
A brief guide of how to get a static site up and running using Jekyll.

Why Learn Jekyll?
Jekyll is a free static site generator that uses vastly more simple file types than other websites using HTML and CSS. Yet it’s complex enough for recruiters to care about this particular skill.
It’s open source, easy to learn, and allows for free hosting on Github. I’m confident that Jekyll will be a great asset to anyone who decides to learn it, especially to those who have never made or learned how to make a traditional website before.
Step 0: Prerequisites
This guide will be using the Windows installation and configuration process.
Having VS Code installed
I highly recommend using VS Code when dealing with Jekyll sites. It lets you edit the files within your Jekyll site, it has built in version control using Git and Github, and it also has a terminal with various types of shells, such as WSL, Git Bash, Powershell, and more. Some of these you’ll have to download, some are pre-installed. Either way, VS Code is exceptional, I use it for my site and for other things, and I think you should as well.
Understanding the CLI
Jekyll sites are created, maintained, and updated using the Command Line Interface terminal and an IDE, like VS Code, to manage files. If you’ve never used the Terminal before, I suggest searching up some guides on Youtube to learn it at a basic level.
Beyond this isn’t required for Jekyll, but it will be to your benefit.
Downloading Ruby
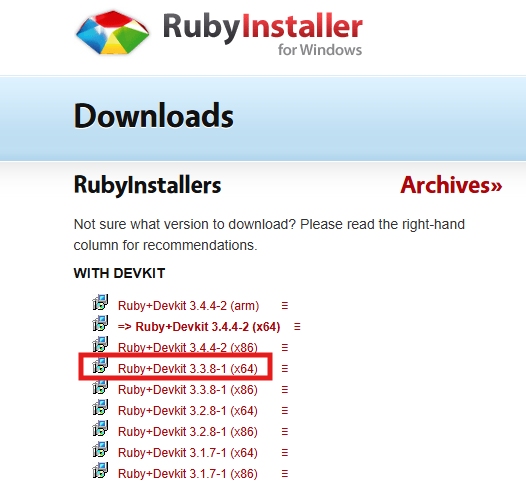
To download Ruby, navigate to Ruby’s website and download the most stable version of the Ruby+Devkit installer, and for the purpose of this guide, it’s the Ruby+Devkit 3.3.8-1 (x64) installer. This is due to the Gem file error only being fixable using this version, as far as I’m aware.
Run the installer with default settings, unless otherwise desired.
Once the Finish button appears, select the checkbox that says Run 'ridk install'. This will open the Terminal for a subsequent installation of the Ruby Devkit once you hit the Finish button.

Click the Finish button and wait for the Terminal to open.
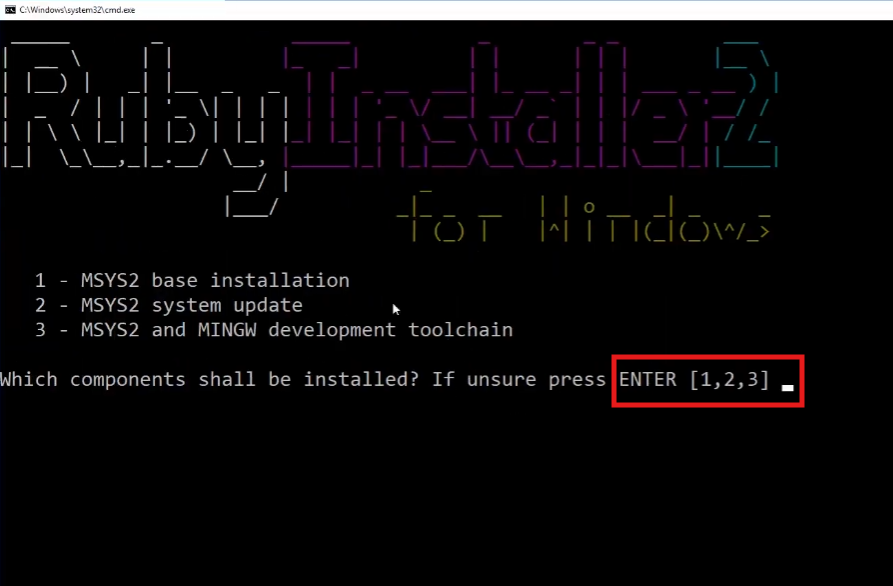
This is an older screenshot. It should say
“RubyInstaller 3 For Windows”since we installed version3.3.8-1.
The Terminal will ask for user input beyond this point, and the options given are 1, 2, and 3. You can just hit the Enter key if you’re unsure, but it’s better to be safe and download all the options separately by inputting 1 and hitting enter, then similarly for 2 and 3.
If prompted to enter Y or N at any point when installing these options, always enter Y to continue.
Once all options have been installed, you may close the Terminal.
BONUS: Having Git Installed
I highly recommend installing Git because Jekyll works with it very well, so well that Jekyll automatically creates Git related files like the .gitignore file to maximize efficiency. You can download Git here.
BONUS X2: Having a Github Account
I also highly recommend creating a Github account. Just head to Github.com and create one there. It’s free, you get access to many developer benefits such as creating repositories and contributing to others, and when coupled with Jekyll, you can host your website on the cloud for free using Github Pages.
You can create an unlimited amount of project sites, but only one if it’s a personal site.
Step 1: Downloading Jekyll with Bundler
Now you’re ready to download Jekyll with the Bundler gem.
Open your Terminal, and type in:
1
ruby -v
If this doesn’t return an error, then that means Ruby was successfully installed.
Similarly, type in:
1
gem -v
If this also doesn’t return an error, you’re ready to move on.
Now, to install Jekyll with Bundler, type in:
1
gem install jekyll bundler
If you’re using the WSL terminal, then type in:
1
sudo gem install jekyll bundler
This is because the command without sudo won’t work in WSL due to permission issues.
This is where the Gem file error typically appears. If no error shows up, and typing in
jekyll -vdoesn’t return an error either, you successfully downloaded Jekyll and can safely skip the next section about the gem file error.
Check if bundler is properly installed as well by typing in
bundler -v.
How to Fix the Gem File Error
If an error shows up, usually a long error talking about unsigned ints or something, then you have encountered the Gem File error.
Don’t worry, thanks to Ruby contributors on Github helping me after opening up an issue, there is a fix.
First, open the terminal and check the GCC version that was installed with the Ruby installer by typing in:
1
ridk exec gcc --version
If the terminal returns 15.0.1 or a later version of 15, then that’s where the error is coming from. Apparently, GCC version 15.0.1 changed many staple things, which caused a lot of issues with programs that updated to that version.
To fix this, we’re going to have to downgrade to a previous version of GCC. To do that, since we already installed Ruby+Devkit 3.3.8-1, these next steps will be relatively simple.
In the directory that your terminal uses, download the following files:
1
2
3
4
https://github.com/ruby/setup-msys2-gcc/releases/download/msys2-packages/mingw-w64-ucrt-x86_64-gcc-14.2.0-3-any.pkg.tar.zst
https://github.com/ruby/setup-msys2-gcc/releases/download/msys2-packages/mingw-w64-ucrt-x86_64-gcc-14.2.0-3-any.pkg.tar.zst.sig
https://github.com/ruby/setup-msys2-gcc/releases/download/msys2-packages/mingw-w64-ucrt-x86_64-gcc-libs-14.2.0-3-any.pkg.tar.zst
https://github.com/ruby/setup-msys2-gcc/releases/download/msys2-packages/mingw-w64-ucrt-x86_64-gcc-libs-14.2.0-3-any.pkg.tar.zst.sig
Then, run the following commands in the terminal:
1
2
ridk exec pacman.exe -Udd --noconfirm --noprogressbar mingw-w64-ucrt-x86_64-gcc-libs-14.2.0-3-any.pkg.tar.zst
ridk exec pacman.exe -Udd --noconfirm --noprogressbar mingw-w64-ucrt-x86_64-gcc-14.2.0-3-any.pkg.tar.zst
You should see the following pop up in the terminal:
1
warning: downgrading package mingw-w64-ucrt-x86_64-gcc-libs (15.1.0-1 => 14.2.0-3)
Complete the downgrade, and run this command again in your terminal:
1
ridk exec gcc --version
You should now see 14.2.0-3 instead of any version of 15, meaning you have successfully downgraded.
Now, try to install Jekyll with Bundler again:
1
gem install jekyll bundler
It should install correctly by this point with no further errors.
If you’re still getting an error, I recommend opening a Github issue on the Ruby installer’s Github repository here.
Step 2: Creating a Site
To create a site, all you have to do is open the terminal, switch to your desired directory if you want, and type in:
1
jekyll new (name of your site)
And that’s it! Congratulations, you created your first Jekyll site.
Step 3: “Serving” Your Site
“Serving” is just another way of viewing or starting your website locally. To do that, simply type into your terminal:
1
bundle exec jekyll serve
The terminal should link you the address to your site.
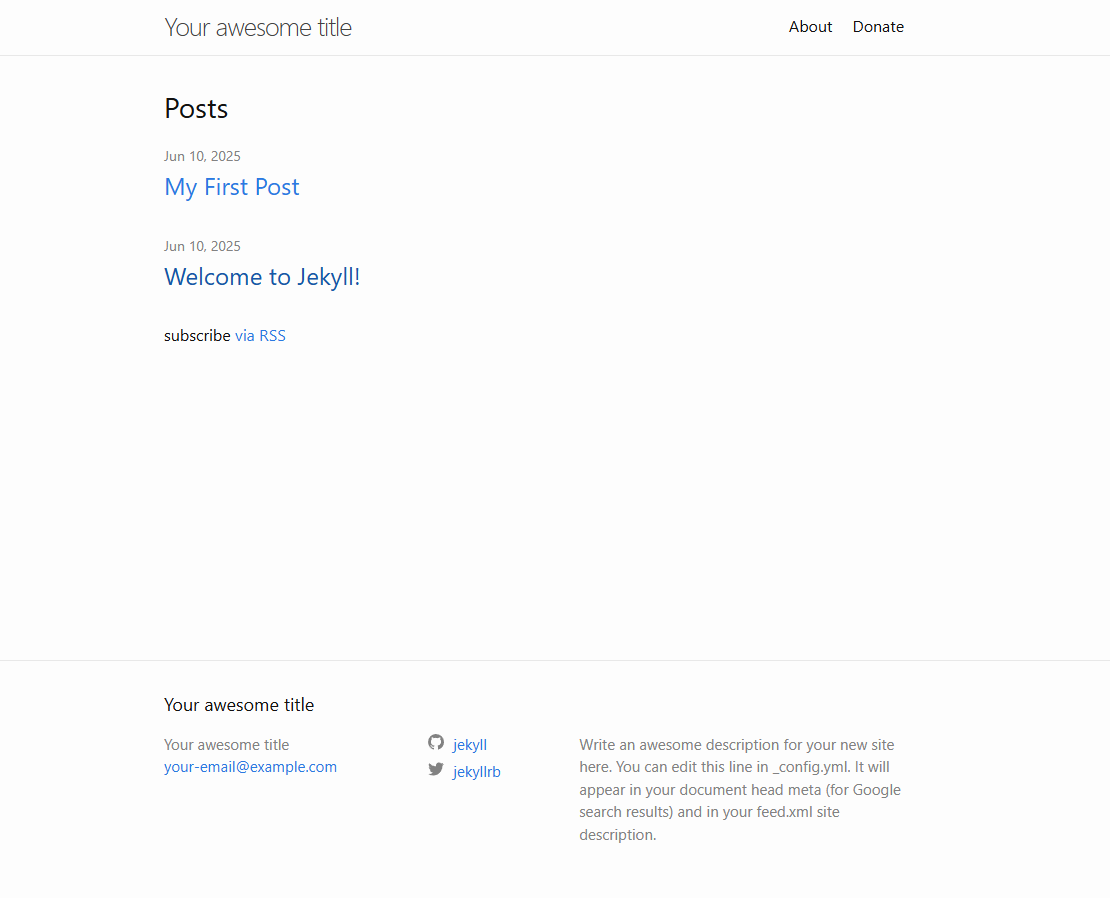
If you’re unsure how to get to your site, just open up a new tab in your browser and type in localhost:4000. You should see your site with all the default settings.

As it currently is, you should see a white site using the default Minima theme. Take a look at everything, like the pre-made posts, the About page, the structure of the site, and more.
In the future, to serve your site you’ll only need to type:
1
jekyll serve
Step 4: Editing Your Site
To understand how to edit your site, first you must understand what format or file types Jekyll employs for editing its contents.
Jekyll primarily uses two file types: YAML and Markdown.
YAML, which stands for YAML Ain’t Markup Language, is a data serialization language used for the storage, transfer, and configuration of data. It’s relatively simple, human-readable, and an easy to learn type of data “container”.
Markdown is a markup language that uses plain text to format plain text, having the ability to add titles, headers, paragraphs, tables, and more. It’s extremely easy to use, requires no prior HTML or CSS knowledge to use, and is lightweight and consistent across any device.
Where Jekyll employs YAML the most is in the _config.yml file and in the frontmatter of Jekyll posts (explained soon). Beneath the frontmatter, where the general content of Jekyll posts exist, is mostly in Markdown.
The Config File
This is where most of the data of the site is stored. In YAML format, it contains all the defaults to your site, like which gem files you’re using, themes, icons, links, etc. You should be able to see the default installed theme, which is “Minima”. This will ultimately vary depending on which theme you use, but for the purpose of this guide, just leave the config file alone until you become acclimated to the Jekyll structure and workflow.
Creating Posts
Before creating a post for your site, navigate to the _posts folder in your site’s directory, and view the premade file that exists.
This will be the general structure of most of your posts going forward: frontmatter at the top between the lines, content at the bottom.
Now, create a new file using the YYYY-MM-DD-(file name) format with the .md or .markdown extension, and open it. After opening the file, you need to create some frontmatter.
Note: frontmatter uses YAML, even in Markdown files.
Frontmatter
To create some frontmatter within your post, create a block for it by adding 3 new lines and typing in 3 hyphens at the top and bottom, like so:
1
2
3
---

---
The middle is where the YAML frontmatter will be added. Remember, YAML acts as the “container” of our Jekyll site’s data, so fill in the gap between the hyphens like a container.
The standard frontmatter that you should add for every post is as follows:
1
2
3
4
5
6
7
---
layout:
title:
description:
date:
author:
---
These frontmatter elements are universal to all Jekyll themes, with Layout being the only one that is specific to your Jekyll theme. The default theme Minima comes with many different types of layouts, and the most common type of layouts you will use with this theme (if you don’t change themes) are Post and Page.
Since you’re in the _posts directory, you will fill this in as a Post. Typical frontmatter settings would look like so:
1
2
3
4
5
6
7
---
layout: post
title: My First Post
description: This is the first Jekyll post I’ve ever created!
date: 2025-06-10 23:41:00 -0400 ## (<< for EST adjustment)
author: Salih Warsama
---
To take a look at your changes, save everything, and type into your terminal jekyll serve and enter into your browser localhost:4000. Take a look at your new post and see if it shows up.
You should see it empty, and that’s because you added no Markdown content. Go back into your editor, beneath the frontmatter, type in anything you want and save your changes. It should look something like this:
1
2
3
4
5
6
7
8
9
---
layout: post
title: My First Post
description: This is the first Jekyll post I’ve ever created!
date: 2025-06-10 23:41:00 -0400 ## (<< for EST adjustment)
author: Salih Warsama
---
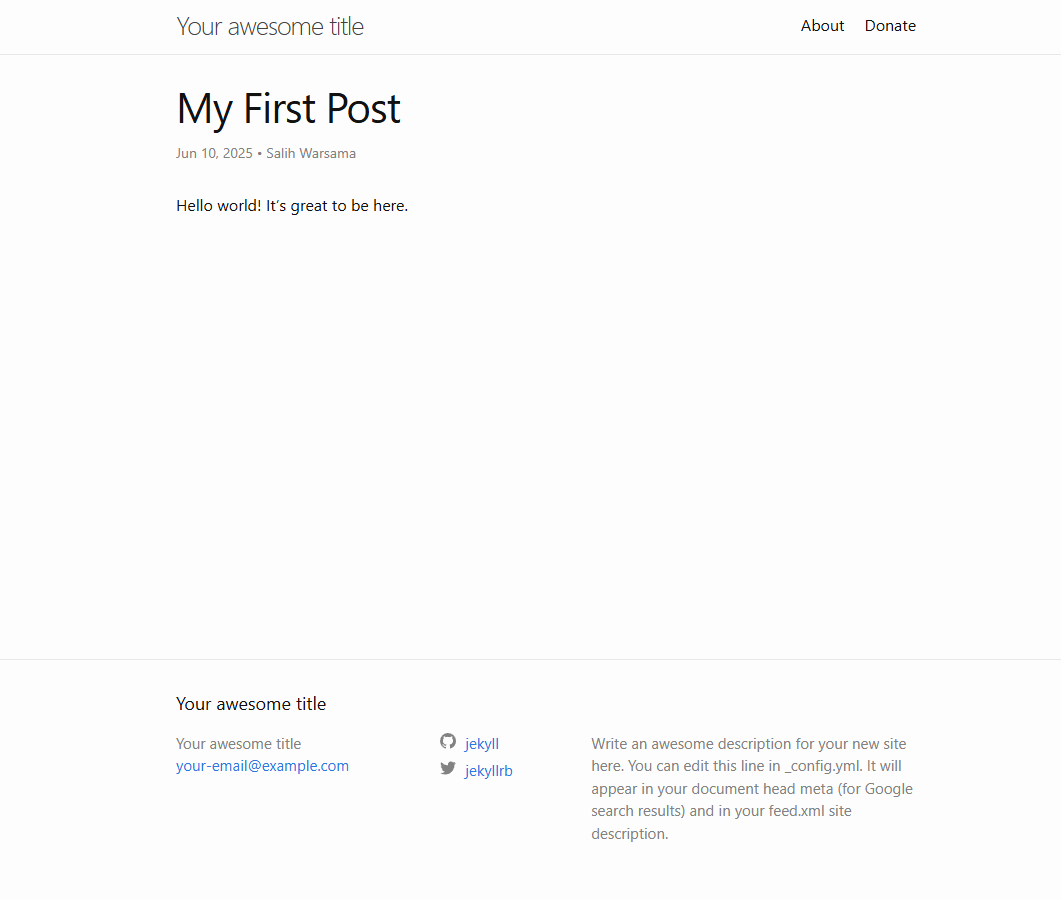
Hello world! It’s great to be here.
Note: Frontmatter must be completely filled out or completely blank for your site to not break.
Now, serve up your site again at the local host address. You should see what you wrote now!
Markdown Formatting
You should also know about how Markdown creates titles, headers, bullets, tables, pictures, and more.
Here’s a file setup that displays some of the many ways you can format within Markdown for your Jekyll posts:
1
2
3
4
5
6
7
8
9
10
11
12
13
14
15
16
17
18
19
20
21
22
23
24
25
26
27
28
29
30
31
# Title
## Subheading
This is a test for my markdown file.
more text that will still appear on the same line
text that will appear on a new line
- first bullet
- second bullet
- third bullet
- sub bullet
1. inner number
[this is the description for an embedded link](https://www.github.com)
This paragraph has some `variable` inline code

Some paragraph with text
> blockquote text below the paragraph
| table heading | table header | table head |
| --- | --- | --- |
| content | more content | text |
| more | more | more |
This is being *created* on a **Friday** ~~Saturday~~.
Serve this and see how it looks on your site!
Creating Pages
As I said, the Minima theme allows you to create pages as well. To create a page, create a new folder called _pages, open the folder, and create a new markdown file with the .md extension.
Add frontmatter elements, like how you did for your first post above, but instead of the “post” layout, enter “page” into layout:
1
2
3
4
5
6
7
---
layout: page
title: My First Page
description: This is the first Jekyll page I’ve ever created!
date: 2025-06-10 23:41:00 -0400 ## (<< for EST adjustment)
author: Salih Warsama
---
It should look a lot like the Home and About pages.
Posts are generally more important than Pages for Jekyll when you’re first starting, since Pages are a little more advanced. So for the purposes of this guide, I won’t go any further in depth.
For more information on Pages in Jekyll, I recommend watching this tutorial.
Step 5: Adding Themes
Themes are very important within Jekyll, in fact, it’s probably one of the first things you want to decide on when creating a site. Sure, the Minima theme is nice, minimal, and has a lot of functionality–a lot more functionality than most themes you’ll come across actually–but it may not be what you want.
Don’t worry, there are plenty of themes out there, both free and paid. If you want to change your theme, first you have to find your theme online.
The best place to look for free Jekyll themes is Jamstack Themes. Check out all the themes they have through their demos!
When you find a theme that you like on there, just click on the Github button and scroll to the README section beneath the code, which is where you’ll usually find instructions on how to install and apply the theme.
Step 6: Working with Git
This section will assume that you: already have Git installed, and have a basic understanding of Git and its workflow.
The Git workflow pairs perfectly with Jekyll, especially since Jekyll automatically creates the ideal .gitignore file and makes maintaining your site a lot better and more efficient.
To take advantage of these benefits, simply open up your terminal window, navigate to the directory your website was created in, and type in:
1
git init
Now you’ll be able to make changes in your files, like your posts, stage them, and commit them with a message, taking full advantage of all the benefits that Git’s version control offers.
Step 7: Working with Github and Github Pages
This section will assume that you: already have a Github account, and have a basic understanding of Github and its workflow.
Github is also a great thing to utilize alongside Git when it comes to maintaining your site. With Github, you’ll be able to store your files on the cloud, update and retrieve them whenever you like, and revert any changes if necessary.
First, go into your site’s _config.yml file, and update the baseurl variable’s value to match your website’s name.
Since you created your site locally and already initialized a Git repository, all you have to do is:
- Create a repository on Github.
- Give it the same name as your website and the baseurl in your
_config.ymlfile. - Then type into your terminal:
git remote add origin (your new github repository’s url)
- Finally type in
git push -u origin master.
Now, you’ve created a connection between your local Git repository and the cloud repository on Github for your site. Remember to keep them both up to date.
Now that your site is stored in a repository on Github, you’ll have access to free website hosting through Github Pages.
You’ll be able to view your website at: (Github-username).github.io/(repository-name).
Closing
You now have the skills to create, maintain, and customize any Jekyll site you create.
If you want to learn more about Jekyll or just a more in-depth understanding on what you can do in Jekyll, I highly recommend checking out Giraffe Academy’s Jekyll tutorial on Youtube.
It’s highly informative and extremely helpful when it comes to the customization aspect.
The Giraffe Academy tutorials are pretty out of date, but I still think it’s helpful to the average individual for learning Jekyll.
Some Advice
When it comes to maintaining your Jekyll sites: always start with an outline.
If you like details and you want your vision of what you want to make to actually have a form before trying to code it into your site, I highly recommend that you start with some sort of outline.
List out all the titles, headers, formatting, and the content you wish to speak about in that outline, and you’ll have a much better and easier time creating posts for your site.
I also recommend to commit changes moderately, not too often or rarely. Only when you make major changes should you commit to them first, unless you’re correcting a mistake or a bug or only making a minor update to a finished post.
I hope you found some value in this guide, and I hope you’ll enjoy working with Jekyll as much as I do!